
A gel manicure uses gel-based polish that cures under an LED or UV lamp, creating a hard, chip-resistant finish with a high-gloss shine that regular nail polish simply cannot match. If you want two or three weeks of wear without touching up, gel is the right call. If you change colors weekly or hate the removal process, regular polish or press-ons will save you time and money.
This guide covers the full picture: how gel cures, what it costs at a U.S. salon, safety signals to watch, step-by-step application, safe removal, and how to decide between a DIY kit and a professional appointment.
Table of Contents
- Benefits, downsides, and safety signals worth knowing
- What a gel manicure costs and how long it actually lasts
- How to remove gel polish without damaging your nails
- At-home gel kits vs a professional salon: which one fits your situation
- How to choose a salon or nail technician you can actually trust
- Key Takeaways
- The part most gel guides skip
- Book a gel manicure at Foxynailsreno in Reno, NV
- Useful sources
Benefits, downsides, and safety signals worth knowing
Gel polish earns its popularity for practical reasons. The finish stays glossy and chip-free for two to three weeks under normal conditions, averaging 18–21 days according to NailMuse, with disciplined care pushing that toward four weeks for some clients. The nails harden immediately after curing, so there is no smudging on the drive home. For people who work with their hands constantly, that durability is the main draw.
The downsides are real and worth understanding before you book.
Nail thinning is the most common complaint, and it almost always traces back to improper removal, not the gel itself. Peeling or forcefully filing off gel strips away layers of the natural nail plate. Done repeatedly, it leaves nails thin, brittle, and prone to breakage.
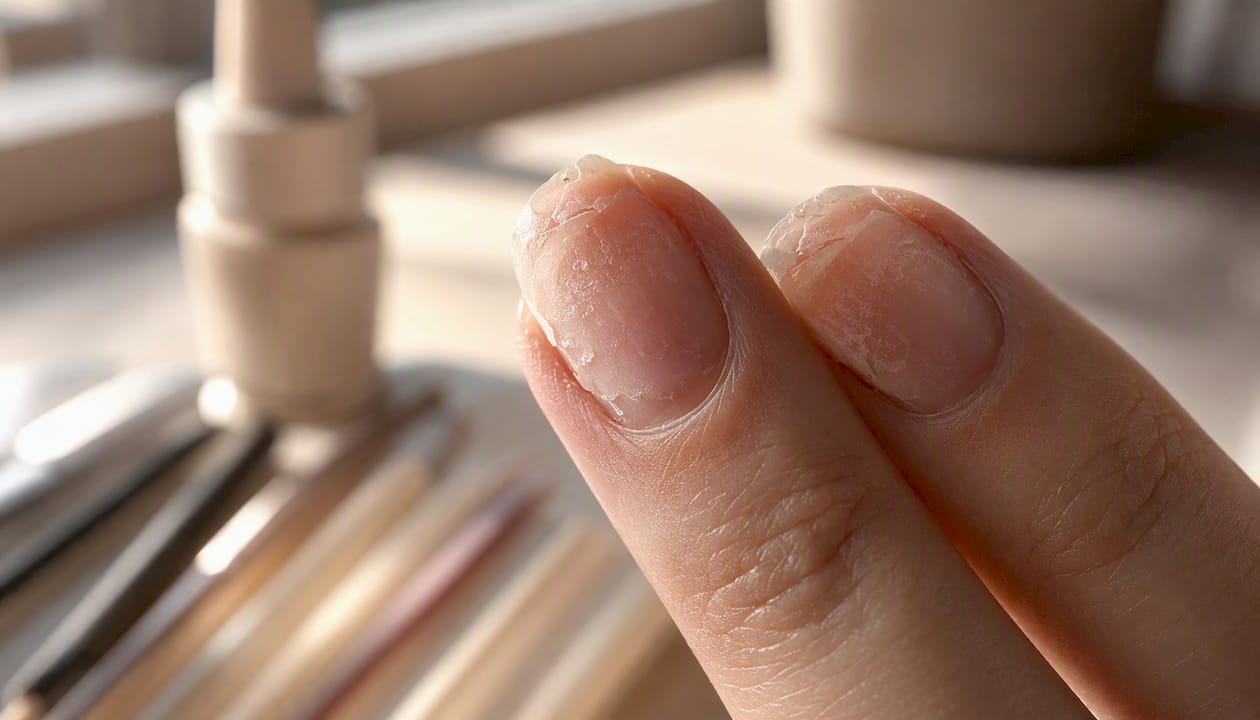
Allergic reactions are less common but more serious. The culprit is usually HEMA (hydroxyethyl methacrylate), a bonding agent in many gel formulas. Repeated skin contact with uncured gel, not just wearing it, is what sensitizes people. Once sensitized, the reaction can extend to other acrylate-based products including dental materials. Madam Glam’s HEMA-free, 21-free formulations are one example of brands responding to this concern; if you have sensitive skin or a history of contact dermatitis, look for explicitly HEMA-free labels and consider a patch test.
UV exposure during curing is low-dose but cumulative. Applying broad-spectrum SPF 30+ to the backs of your hands before the appointment, or wearing UV-protective gloves with the fingertips cut off, reduces that exposure meaningfully.
The American Academy of Dermatology advises that gel manicures can weaken nails over time and recommends taking breaks between gel applications to allow the nail plate to recover. They also flag that UV lamps used for curing carry a small but real skin risk, particularly for clients with a history of skin cancer.
Pro Tip: The most common reason gel chips before two weeks is mechanical stress, not product failure. Stop using your nails to open cans, peel stickers, or type with the tips. Treat them as decoration, not tools, and wear time extends noticeably.
What a gel manicure costs and how long it actually lasts
U.S. salon prices for a basic gel manicure typically run $35–$55. Add-ons push that number up quickly.
| Service | Typical U.S. Price Range |
|---|---|
| Basic gel manicure | $35–$55 |
| Gel with nail art or designs | $35–$55 |
| Builder/strengthening gel layer | $10–$15 add-on |
| Professional gel removal | $10–$15 |
| At-home kit (lamp + polishes) | $30–$80 upfront |
Wear time averages 18–21 days, though nail growth, hand exposure to water, and prep quality all affect that window. Clients who keep nails shorter, moisturize cuticles daily, and avoid prolonged soaking tend to hit the higher end of that range.
Maintenance math: if you visit a salon every three weeks and pay $45 per appointment plus a $15 removal fee when needed, you are spending roughly $60 per service cycle. A quality at-home kit costs $30–$80 upfront and then a few dollars per application in polish, which makes DIY cheaper over time if you use it consistently. The trade-off is skill and time, covered in the comparison section below.
How to remove gel polish without damaging your nails
Improper removal causes more nail damage than gel polish itself. The rule is simple: soak, don’t scrape.
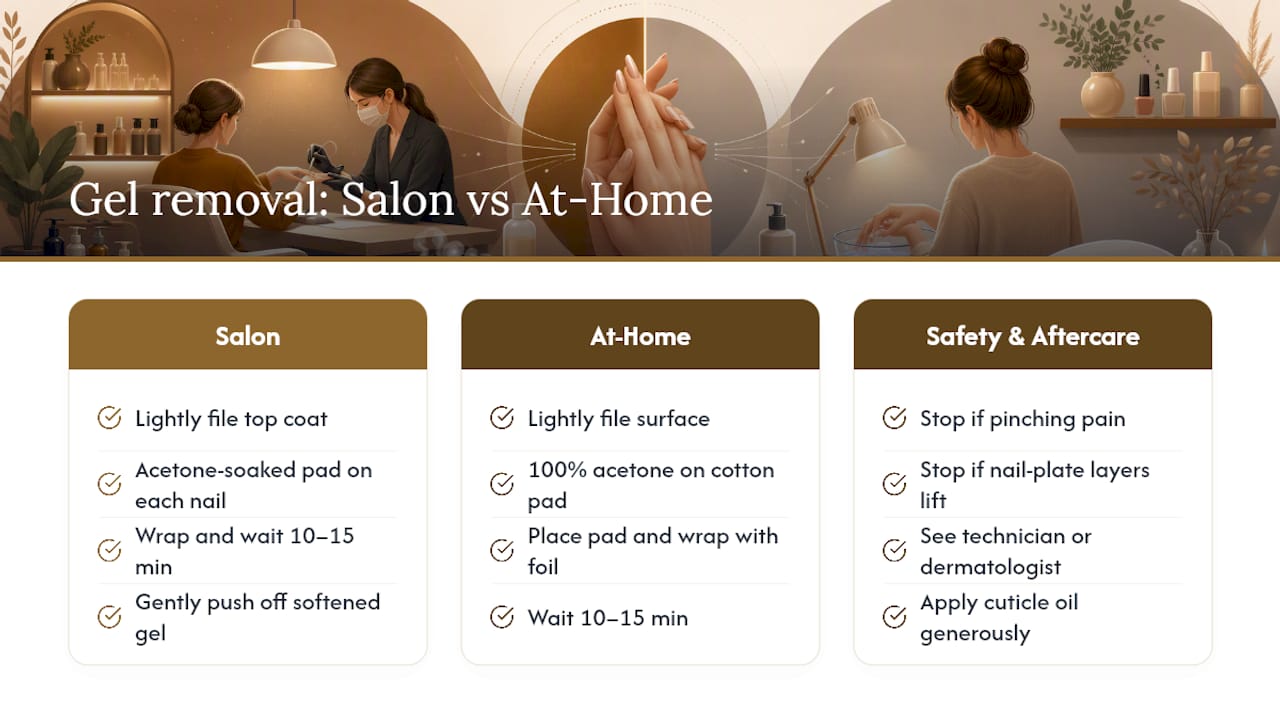
Salon removal is the safest route. A technician lightly files the shiny top coat to break the seal, wraps each nail in an acetone-soaked pad, and waits 10–15 minutes before gently pushing off the softened gel with a cuticle pusher. No force. If the gel does not slide off easily, it needs more soak time, not more pressure. BeyondPolish’s removal guidance emphasizes that mechanical removal should only happen after adequate acetone contact.
At-home removal follows the same logic. File the surface lightly, soak cotton pads in 100% acetone, place one on each nail, and wrap with foil. Wait 10–15 minutes. The gel should lift with minimal effort from a wooden cuticle stick. If it resists, rewrap and wait another five minutes.
Stop immediately if you feel pinching pain, see layers of the nail plate coming away with the gel, or notice a raw, tender nail bed. Those are signs of damage in progress. At that point, stop the DIY removal and see a licensed nail technician or dermatologist.
Pro Tip: Acetone strips moisture and oils from the nail and surrounding skin. After any removal, apply cuticle oil generously and follow with a hand cream. Nails that feel brittle or paper-thin after removal benefit from a week or two of rest before the next gel application.
At-home gel kits vs a professional salon: which one fits your situation
The honest answer is that both work, but they work for different people.
At-home kits have improved significantly. The OPI GELement system pairs a matched lamp with salon-grade gel formulas and provides stepwise prep and curing guidance designed to replicate professional results. The Olive & June Gel Mani System is another complete option, marketed as HEMA-free and sold as a matched lamp-plus-polish kit. For a simpler entry point, the Le Mini Macaron 1-Step DIY Glossy Gel Kit includes a mini LED lamp, gel polish, and removal pads, with instructions that emphasize thin layers and precise cure times. Essie’s at-home approach focuses on gel-like results using their existing polish line, useful if you want the look without a full lamp investment.
For ingredient-conscious clients, Madam Glam’s HEMA-free formulas offer a clean-formula option worth considering, particularly if you have had reactions to standard gel products.
The critical variable for at-home systems is lamp-to-product matching. A mismatched lamp can leave gel under-cured, producing a soft, sticky finish that lifts within days.
| Factor | At-home kit | Professional salon |
|---|---|---|
| Durability | 1–2 weeks typical (varies by skill) | 2–3 weeks typical |
| Cost per mani | Low after upfront kit cost | $35–$55 per visit |
| Damage risk | Higher if prep or removal is rushed | Lower with a trained technician |
| Removal difficulty | Moderate; requires discipline | Handled by the technician |
| Time required | 45–60 min (learning curve) | 30–60 min |
| Best use case | Frequent color changers, budget-focused | Nail health concerns, complex art, events |
When to choose a salon: nail damage or thinning, complex shapes or nail extensions, intricate gel nail art designs, or any time you are unsure about your own prep and removal technique. Just as hair extensions require matched products and careful maintenance to avoid breakage, gel nails demand the same discipline around prep and aftercare.
When DIY makes sense: you are comfortable with the process, you change colors frequently, and you have a matched lamp-and-gel system.
How to choose a salon or nail technician you can actually trust
Not all gel manicure services are equal. These questions cut through the noise fast.
Ask before you book:
- What lamp brand and gel system do you use, and are they matched?
- What is your removal policy? Do you charge separately for removal?
- How do you sanitize tools between clients?
Ask when you arrive:
- Can I see the lamp? (Check that it is plugged in, clean, and functioning.)
- Will you cap the free edge on every layer?
Walk away if you see:
- Gel applied directly onto the cuticle or skin.
- A technician scraping or harshly filing the nail plate during removal.
- Shared jars or brushes between clients without sanitization.
- A rushed prep that skips dehydration or base coat.
- Vague answers about their removal process.
For clients with nail psoriasis, chronic onycholysis (nail plate separation), or a history of contact dermatitis, a dermatologist consultation before booking is worth the extra step. A licensed nail technician should recognize these conditions and refer you rather than proceed. If you are pregnant or concerned about ingredient exposure, the pregnancy-safe manicure guidance at Foxynailsreno covers what to watch for.
You can also compare gel vs. acrylic options if you are deciding between service types before you book.
Key Takeaways
A gel manicure lasts 18–21 days on average, but proper prep, capping the free edge, and safe acetone removal are what separate a great result from a damaged one.
| Point | Details |
|---|---|
| Average wear time | Gel manicures last 18–21 days; disciplined aftercare can push that toward four weeks. |
| Biggest damage cause | Improper removal (peeling or scraping) thins the nail plate; always soak off with acetone. |
| Ingredient safety | Check for HEMA-free labels if you have sensitive skin; patch-test new gel products before a full set. |
| At-home vs salon | DIY kits cost less per use but require matched lamp and gel; salons offer better durability and safer removal. |
| Foxynailsreno | Foxynailsreno in Reno, NV offers professional gel manicures, nail art, and safe removal by trained technicians. |
The part most gel guides skip
There is a gap between what gel manicure marketing promises and what actually determines whether you are happy three weeks later. Every brand sells durability. Almost none of them sell the prep.
The single biggest predictor of how long a gel manicure lasts is what happens in the first five minutes of the appointment, before a drop of polish touches the nail. Dehydration, cleaning, and a properly applied base coat that caps the free edge will outperform any premium gel formula applied over an oily, unprepared nail plate. Clients who switch salons chasing a “better” gel brand and still get early chipping are almost always dealing with a prep problem, not a product problem.
The same logic applies to removal. The reason dermatologists and nail technicians both flag gel damage is not that gel is inherently harmful. It is that the removal step gets rushed or skipped entirely. Peeling gel off feels satisfying in the moment and costs you weeks of nail recovery afterward.
My honest recommendation: before you evaluate any gel system or salon, ask one question. “What do you do to prep the nail before the base coat?” A technician who gives you a specific, confident answer about dehydration and surface prep is worth booking. One who looks uncertain or skips straight to color is a risk, regardless of the brand they use.
Book a gel manicure at Foxynailsreno in Reno, NV
Foxynailsreno delivers the prep-first approach that actually makes gel last. The salon’s gel manicure services in Reno cover everything from a clean, classic gel finish to detailed nail art designs, builder/strengthening gel layers, and professional soak-off removal handled by trained technicians who follow proper cure times and capping technique.

Whether you want a simple, long-lasting gel polish or something more intricate, Foxynailsreno’s team works with you on shape, color, and any nail health concerns before touching a brush. Safe removal is part of the service, not an afterthought. Families are welcome, and the salon offers gentle options for kids alongside adult services.
Book your appointment at Foxynailsreno and see what a properly prepped, correctly cured gel manicure actually feels like.
Useful sources
- American Academy of Dermatology: Gel manicures
- BeyondPolish: Gel polish — complete guide to application, longevity & removal
- NailMuse: How long do gel nails last?
- OPI: GELement at-home gel nail polish
- Le Mini Macaron 1-Step DIY Glossy Gel Manicure Kit — Ulta product page
- Olive & June Gel Mani System — Ulta product page
- Essie: How to get gel-like nails at home
- Madam Glam: clean gel polish formulas (HEMA-free, 21-free claims)