
If your nails look white, feel bendy, or hurt after acrylics, the first move is simple: stop anything that makes it worse. Trim them short, smooth any rough edges with a glass file, and apply a jojoba-based oil twice a day starting today. Book a professional soak-off rather than attempting removal at home, and give your nails a 4–6 week break from hard enhancements.
Red flags that need attention now:
- Spreading green or yellow discoloration under the nail (possible infection)
- Severe pain that doesn’t ease within a few days
- Nail lifting away from the bed with visible separation or odor
Pro Tip: Apply cuticle oil the moment you notice soreness — within the first 24 hours. Rehydrating the plate early shortens recovery noticeably.
Key Takeaways
Damaged nails after acrylics recover fastest when you stop mechanical harm immediately, hydrate consistently with jojoba oil twice daily, and protect the thinned plate with a BIAB overlay while new growth comes in.
| Point | Details |
|---|---|
| Stop damage first | Avoid picking, peeling, and acetone soaks; trim short and file in one direction only. |
| Oil twice daily | Jojoba-based oil applied morning and evening restores lipid balance faster than any hardener. |
| Realistic timeline | Mild damage resolves in 4–8 weeks; severe cases take 3–6 months for full regrowth. |
| BIAB protects while you heal | A bond-only overlay shields the thinned plate without adding buffing stress. |
| Foxynailsreno | Offers assessment, safe soak-off, BIAB overlays, and a structured follow-up plan in Reno, NV. |
Table of Contents
- 1. Why acrylics damage your natural nail plate
- 2. How to tell how bad the damage is
- 3. What to do in the first 48–72 hours
- 4. Salon and clinical options that speed recovery
- 5. The daily home care routine that actually moves the needle
- 6. What to expect week by week during recovery
- 7. How a quality salon handles acrylic-damaged nails
- What the recovery process really comes down to
- Ready to give your nails a proper recovery at Foxynailsreno
- Sources
1. Why acrylics damage your natural nail plate
Two things cause most of the damage: mechanical force and chemical stripping. Neither is inevitable, but both are common.
The biggest mechanical culprit is the e-file. When a technician buffs the natural nail too aggressively before application, they thin the plate layer by layer. Forcibly levering or peeling product off at removal does the same thing, except faster. Over-buffing and peeling are the most common causes of visible plate damage, and the effects show up immediately as white patches or a surface that feels rough and papery.
On the chemical side, repeated acetone soaks strip the lipids that keep the nail plate flexible and hydrated. Frequent exposure to nail polish and removers dries and weakens nails, and products containing toluene or formaldehyde accelerate that process. Acrylics can also trigger irritant or allergic contact dermatitis, and in some cases lead to conditions like worn-down nail syndrome or onycholysis, where the nail separates from the bed.
The single most damaging thing you can do at home is peel or pick off your acrylics. One forceful peel can strip the top layers of the nail plate in seconds — damage that takes months to grow out. Professional removal done by a trained technician dramatically reduces the risk of lasting plate loss.
2. How to tell how bad the damage is
Not all post-acrylic damage is equal. A quick self-check tells you which recovery track you’re on.
Signs to look for:
- White patches or chalky surface: delamination of the upper nail layers
- Extreme bendiness: the plate has been thinned significantly
- Immediate pain or tenderness when touched: very thin plate, close to the nail bed
- Nail lifting from the bed (onycholysis): separation that can trap moisture and bacteria
- Persistent discoloration (yellow, green, brown): possible fungal or bacterial involvement
White patches, extreme flexibility, and tenderness indicate the nail plate has been thinned; soreness typically improves within a couple of weeks with proper hydration and protection. Separation or discoloration that doesn’t resolve in two weeks warrants a visit to a dermatologist.
| Sign | Likely cause | Recovery estimate |
|---|---|---|
| White patches, mild roughness | Surface buffing, light delamination | Mild: 4–6 weeks |
| Bendy, thin plate, some soreness | Over-buffing, repeated acetone | Moderate: 6 weeks |
| Pain, tenderness, visible thinning | Aggressive e-file or forced removal | Severe: 3–6 months |
| Onycholysis or discoloration | Forced removal, possible infection | See a clinician |
See a doctor or dermatologist if you notice: spreading discoloration, an odor under the nail, pain that worsens rather than improves, or separation that doesn’t close after two weeks of care.
3. What to do in the first 48–72 hours
Think of this as first aid for your nails. The goal is to stop further damage and give the plate a stable environment to start recovering.
Do:
- Trim nails as short as comfortably possible to reduce leverage and catching
- Smooth any jagged edges with a glass file, moving in one direction only
- Apply jojoba or vitamin E oil twice daily, working it into the nail and cuticle
- Wear gloves for any wet work — dishes, cleaning, even long showers
- Book a professional soak-off if any product remains on the nail
Don’t:
- Pick, peel, or force off any remaining acrylic or gel
- Use formaldehyde-based hardeners — they create a brittle surface on an already fragile plate
- Soak nails in acetone at home repeatedly; a single controlled soak at a salon is far safer
- Apply new hard enhancements immediately; the plate needs time to stabilize
Pro Tip: If a nail has partially torn, stabilize it with a silk wrap or a drop of nail repair gel before trimming. This prevents the tear from traveling further toward the nail bed. Skip DIY super glue — it traps moisture and can worsen separation.
Trimming torn parts and filing rough edges prevents further catching and tearing; professional or kit-based repairs are valid short-term fixes while the plate grows out. If pain is significant, over-the-counter ibuprofen or acetaminophen is appropriate for a day or two — but pain that persists beyond a week is a reason to call a clinician.
4. Salon and clinical options that speed recovery
Leaving damaged nails bare sounds logical, but it often backfires. An unprotected thin nail catches on everything, bends, and tears. A well-applied protective overlay is usually the better choice.
What actually works in the salon:
- BIAB (builder in a bottle) overlays: applied with dehydrator and bond only, no buffing of the natural nail. This protects the plate while it grows without adding more mechanical stress. BIAB applied without buffing protects the plate during regrowth, with infills recommended every 3–4 weeks.
- Soft gel overlays: similar principle to BIAB, gentler than hard acrylics, soak off without aggressive filing
- Gentle soak-off protocols: warm acetone with foil wraps, never forced, with minimal scraping
What to ask your technician before they start:
- “Can you apply this without buffing my natural nail?”
- “Are you using a dehydrator and bond-only prep?”
- “How do you remove this at the end of the set?”
- “Do you use a light touch with the e-file, or can we skip it entirely?”
- “Can we schedule a soak-off removal rather than a fill at my next appointment?”
Red flags to watch for:
- Heavy e-file pressure that creates heat or burning sensation
- Technician skipping a consultation and going straight to buffing
- Rushed removal with a metal pusher rather than a soak
- No discussion of your nail’s current condition before starting
The AAD recommends a 4–6 week break from hard enhancements before returning to acrylics. If a technician pushes back on that timeline or dismisses your concerns, that’s a signal to find someone else.
5. The daily home care routine that actually moves the needle
Consistency beats intensity here. A five-minute daily routine outperforms an occasional deep-treatment session every time, because the nail plate needs steady lipid replenishment, not sporadic intervention.
Product classes worth using:
- Jojoba-based cuticle and nail oil: jojoba’s molecular structure closely mimics the nail’s natural lipids, making it the most effective carrier for rehydration
- Formaldehyde-free strengtheners: look for products with hydrolyzed keratin or calcium — these add flexibility rather than rigidity
- Glass nail file: gentler than emery boards, seals the edge rather than fraying it
- Ceramide-rich hand cream: applied after oil, it locks moisture into the surrounding skin and cuticle
- Silk wrap or nail repair kit: for splits or tears that need temporary stabilization
A practical weekly schedule:
- Morning and evening: one drop of jojoba oil per nail, massaged in for 30 seconds
- After the first 2–4 weeks: apply a formaldehyde-free strengthener 2–3 times per week
- Every time you do dishes or clean: gloves, no exceptions
- Weekly: check nail length and file any snags before they catch and tear
What to avoid entirely during recovery:
- Formaldehyde-based hardeners (they stiffen a plate that needs flexibility)
- Daily acetone soaks or acetone-heavy polish removers
- Aggressive buffing or electric files at home
- Reapplying hard acrylics before the plate has visibly thickened
On biotin supplements: some people find them helpful for nail growth, but the evidence is limited to cases of diagnosed deficiency. If you’re considering them, check with a clinician first, particularly if you take other medications.
6. What to expect week by week during recovery
Recovery isn’t linear, but it follows a predictable pattern. Here’s what to look for at each stage.
| Phase | Timeframe | What you’ll notice | What to do |
|---|---|---|---|
| Stabilize | Weeks 1–4 | Soreness eases, surface still rough | Oil twice daily, keep short, avoid wet work ungloved |
| Fortify | Weeks 4–8 | New growth visible at base, surface smoothing | Add strengthener 2–3×/week, consider BIAB overlay |
| Rebuild | Weeks 8–12 | Plate thickening, less flexibility | Continue oil and strengthener, infills every 3–4 weeks if overlayed |
| Maintain | 3–6 months | Full regrowth, normal thickness | Reassess whether to return to enhancements |
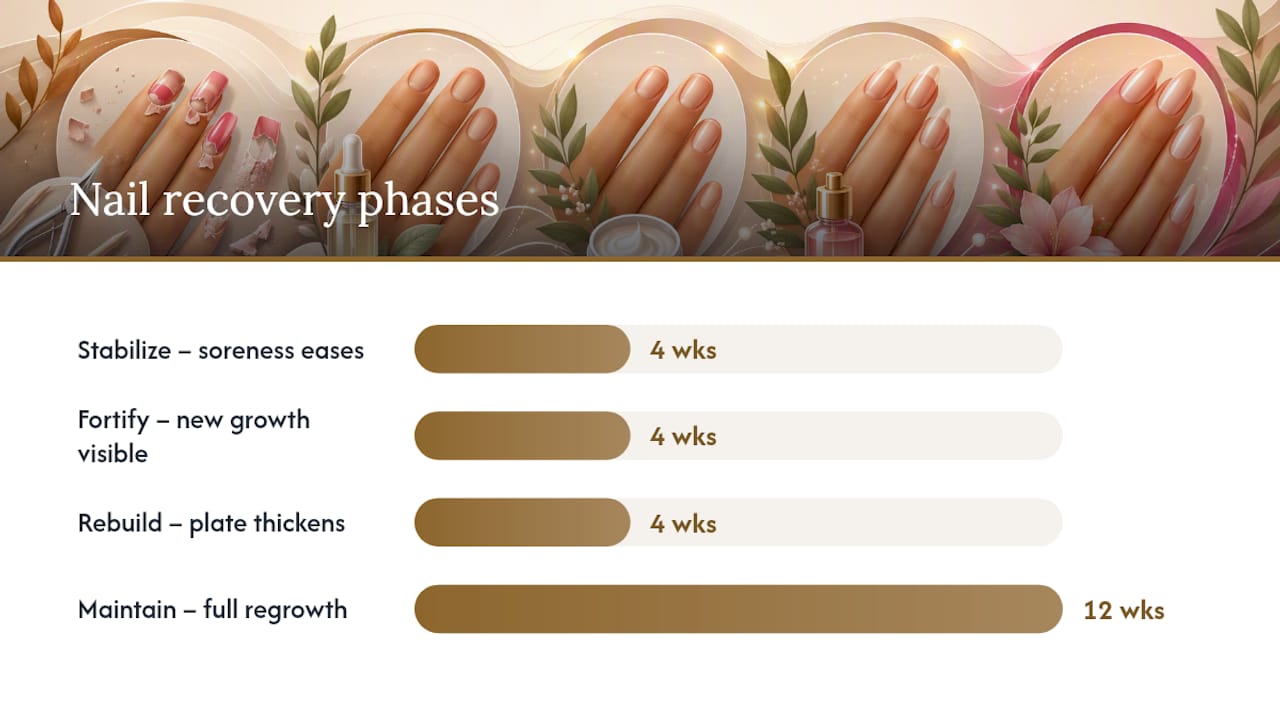
Mild damage (surface buffing, light delamination) typically resolves in 4–8 weeks. Severe damage from forced removal or heavy e-file use can take the full 3–6 months for complete regrowth. The nail grows roughly 3mm per month, so a fully damaged nail needs time regardless of how diligent the care routine is.
Milestone checklist — you’re on track if:
- Soreness is gone by week 2
- New growth at the base looks smooth and opaque (not white or chalky)
- The plate feels less bendy by week 6–8
- No new splits or tears appearing after week 4
Taking regular breaks from hard enhancements and avoiding frequent reapplication without recovery time reduces cumulative damage with each future set.
7. How a quality salon handles acrylic-damaged nails
A responsible technician doesn’t just apply product and move on. Here’s the stepwise protocol you should expect from a high-quality provider.
The appointment, step by step:
- Assessment: the tech examines nail thickness, checks for onycholysis, and asks about your removal history before touching a file
- Safe removal: warm acetone soak-off with foil wraps, no metal levering, minimal scraping
- Minimal prep: dehydrator and bond only — no buffing of a thinned plate
- Protective overlay: BIAB or soft gel applied at the thinnest possible layer to add structure without weight
- Home-care briefing: you leave with specific instructions — oil schedule, glove use, when to come back
- Scheduled follow-up: infill or check-in at 3–4 weeks, with a reassessment of nail thickness at each visit
What a good follow-up plan looks like:
- Infills every 3–4 weeks to maintain overlay integrity
- A reassessment at 8–12 weeks to decide whether the plate is ready for a different enhancement
- Clear guidance on when it’s safe to return to full acrylics (typically when new growth reaches at least halfway up the nail)
- A standing recommendation to avoid the same removal method that caused the original damage
Applying hard enhancements immediately after removal without addressing the thinned plate can trap delamination and extend recovery. A staged approach — protect first, monitor, then re-enhance — avoids that cycle entirely.
What the recovery process really comes down to
Most people underestimate how much the removal method matters compared to the product itself. The acrylic isn’t the villain. The e-file in the wrong hands is. The peeled-off set at home is. Clients who get a careful soak-off and leave with a BIAB overlay often have nails that look and feel fine within a month. Those who peeled their set off in a hurry are still dealing with the fallout three months later.
The other thing people get wrong is reaching for a hardener when nails feel fragile. A formaldehyde-based hardener on a thinned plate creates a rigid shell over a flexible substrate — it cracks rather than bends, and the crack goes deeper. What a damaged nail actually needs is restored flexibility, not more stiffness. Jojoba oil twice a day does more for a recovering nail than any hardener on the market.
Consistency is the whole game. Not a single intensive treatment, not an expensive product used once. Two drops of oil, twice a day, for six weeks. That’s the protocol.
Ready to give your nails a proper recovery at Foxynailsreno
Damaged nails deserve more than a quick fix. At Foxynailsreno in Reno, NV, the first appointment for post-acrylic recovery starts with a real assessment — nail thickness, separation, and removal history — before anything touches your plate.

The salon offers safe acetone soak-off removal, BIAB protective overlays applied with bond-only prep (no buffing on a thinned nail), and a follow-up schedule built around your regrowth pace. You leave with a clear home-care plan, not just a fresh set. For families, kids’ nail services are available at the same appointment.
Book your recovery appointment at Foxynailsreno and start the rehab plan with a technician who knows the difference between a nail that needs protection and one that needs to breathe.
Sources
- Are acrylic nails bad for your nails and skin? — Cleveland Clinic
- How to Repair Damaged Nails After Acrylics or Gel | NailAtlas
- Are acrylics bad for your nails? Research, nail care, and more — Medical News Today
- A look at the effects of nail polish on nail health and safety — Harvard Health
- Cracked nails: reasons and fixes — WebMD
This article is general information, not a substitute for advice from a qualified doctor. Consult a qualified healthcare professional about your own circumstances before acting on anything here.