
Cat eye nails are a magnetic polish effect that creates a shifting, light-catching stripe across the nail surface. The look comes from iron-rich pigment particles in the polish that align under a magnet before the gel cures, locking the pattern in place permanently. You can get this effect several ways:
- Classic magnetic gel: The original velvet-stripe look, dramatic on dark bases
- Glass cat eye: Ultra-fine metallic pigment creates a narrow, translucent sliver of light
- Powder cat eye: A softer glow applied over gel, beginner-friendly
- Barcode/striped: Horizontal scanner lines using a rectangular magnet
- DIY kits: Available at Sally Beauty and on Amazon; solid for experimenting at home
- Salon service: Longer wear, custom layering, and complex art. Foxynailsreno in Reno, NV handles all of these
Key Takeaways
Cat eye nails work because magnetic pigment particles align under a magnet before gel curing locks the stripe permanently — base color, magnet shape, and timing control everything about the final result.
| Point | Details |
|---|---|
| How the effect forms | Magnetic pigment aligns under a neodymium magnet before LED curing locks the stripe into the gel. |
| Most important DIY rule | Work one nail at a time and hold the magnet 1–2mm above the surface for 10–30 seconds before curing. |
| Base color controls drama | Dark bases (black, navy) maximize stripe contrast; sheer or jelly bases create a softer glass effect. |
| Salon vs. DIY decision | Choose a salon for special occasions, complex layering, or nail extensions; DIY suits single-stripe experiments. |
| Foxynailsreno | Books custom cat eye manicures in Reno, NV with professional prep, magnetic activation, and add-on options. |
Table of Contents
- What are cat eye nails, and why is everyone getting them in 2026?
- How does the magnetic effect actually work?
- Which cat eye nail designs are trending right now?
- What tools and products do you need for cat eye nails at home?
- How to do cat eye nails at home: step-by-step
- Salon vs. DIY: which one is right for you?
- Pro tips and common mistakes to avoid
- How to maintain your manicure and remove it safely
- What to expect at Foxynailsreno for a cat eye manicure
- Why magnetic nails keep coming back
- Foxynailsreno does custom cat eye manicures in Reno, NV
- Sources
What are cat eye nails, and why is everyone getting them in 2026?
The visual effect comes from magnetic particles forming a bright linear highlight that shifts as you tilt your hand. That movement is what makes the look so compelling — it reads differently under every light source, which no standard glitter or shimmer polish can replicate.
In 2026, two variants are driving renewed interest: the glass cat eye and the barcode effect. Glass cat eye uses ultra-fine metallic pigment to produce a narrow, almost translucent stripe that looks like light refracting through ice. The barcode variant stacks multiple horizontal lines across the nail for a graphic, editorial feel. Both have picked up significant editorial coverage, and celebrity manicures from Demi Lovato and Jennifer Lopez have pushed the aesthetic from runway to everyday request.
The design works across nail shapes and lengths. Short square nails get a clean, modern stripe; long almond or stiletto nails let the highlight curve dramatically. Base color is a genuine design decision, not an afterthought:
- Dark bases (black, navy, deep plum): Maximum contrast; the stripe reads as bright and sharp
- Sheer or jelly bases: Softer, layered glow; works well for glass and powder variants
- Nude or blush bases: Subtle, wearable; popular for office-appropriate cat eye manicures
- Tinted gel layering: Two sheer coats of different tones create depth behind the stripe
How does the magnetic effect actually work?
Magnetic gel polish contains iron-oxide or similar metallic pigment particles suspended in uncured gel. When you hold a magnet close to the wet polish, those particles physically migrate toward the magnetic field, forming a concentrated line or pattern. Curing the gel under an LED or UV lamp polymerizes the formula around the aligned particles, fixing the stripe permanently. Move the magnet after curing and nothing happens — the pattern is locked into the polymer structure.
That timing is everything for DIYers. The window between applying the polish and curing is your only chance to shape the stripe. A few practical rules follow directly from the science:
- Work one nail at a time — apply, manipulate, cure, then move to the next
- Hold the magnet before you start the lamp, not after
- Keep the magnet 1–2mm above the nail surface without touching the wet polish
- Hold steady for the full recommended time before curing
Pro Tip: Flash-cure technique: after you get the stripe you want, give the nail a 2–3 second flash cure to lock the pattern, then do a full cure. This prevents the design from shifting if your hand moves slightly during the full cure cycle.
Magnet shape matters more than most beginners expect. A standard flat magnet produces a central diagonal stripe. Curved magnets follow the nail’s natural arch for a cleaner line. Dual-ended wands let you switch between a central line, a diagonal sweep, and a starburst pattern without buying multiple tools. For barcode nails, a rectangular magnet held horizontally for about 30 seconds creates the horizontal scanner-stripe effect.
One safety note: avoid getting uncured gel on your skin. The photoinitiators in gel polish can cause sensitization with repeated exposure, so wipe any skin contact before curing.
Which cat eye nail designs are trending right now?
The three core variants cover most of what you’ll see in salons and on social media, but the details within each one are where the real creativity lives.
Classic magnetic gel is the foundation. A single diagonal stripe on a dark base — black, deep navy, or forest green — gives the most dramatic result. Dark base colors increase contrast, making the magnetic shimmer appear sharper and more three-dimensional. This is the version most people picture when they hear “cat eye nails,” and it hasn’t lost its appeal despite being the oldest of the three.
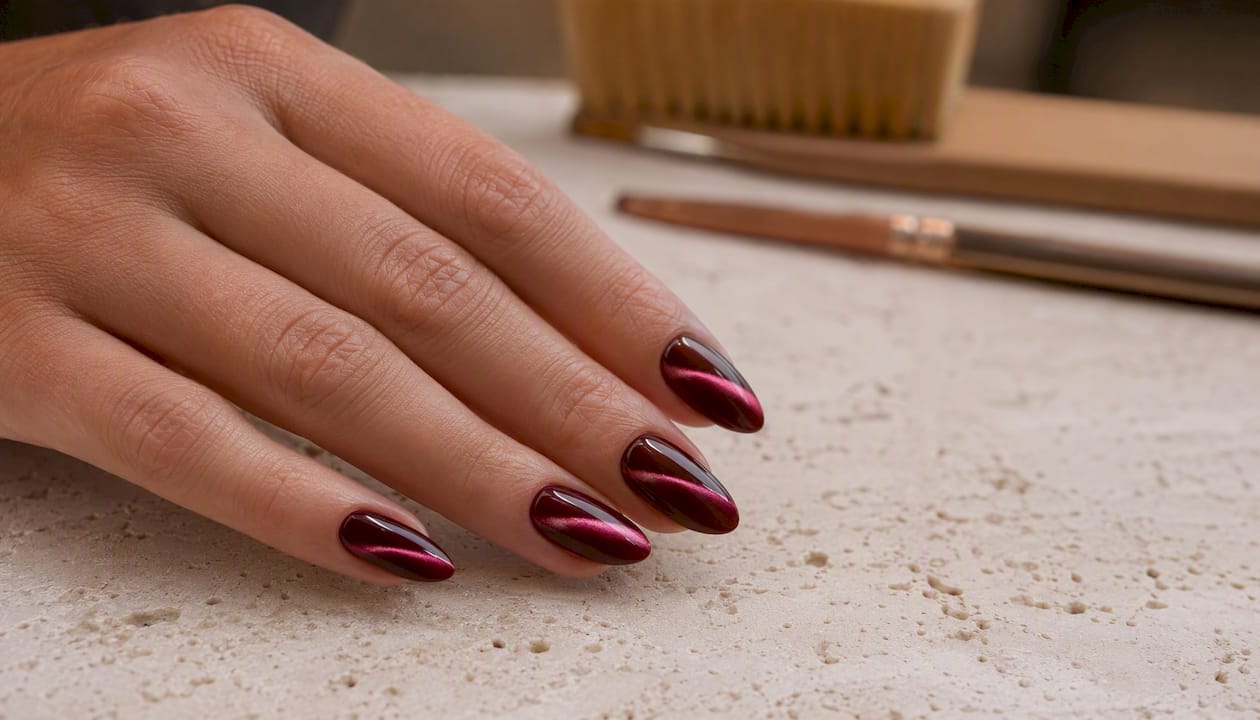
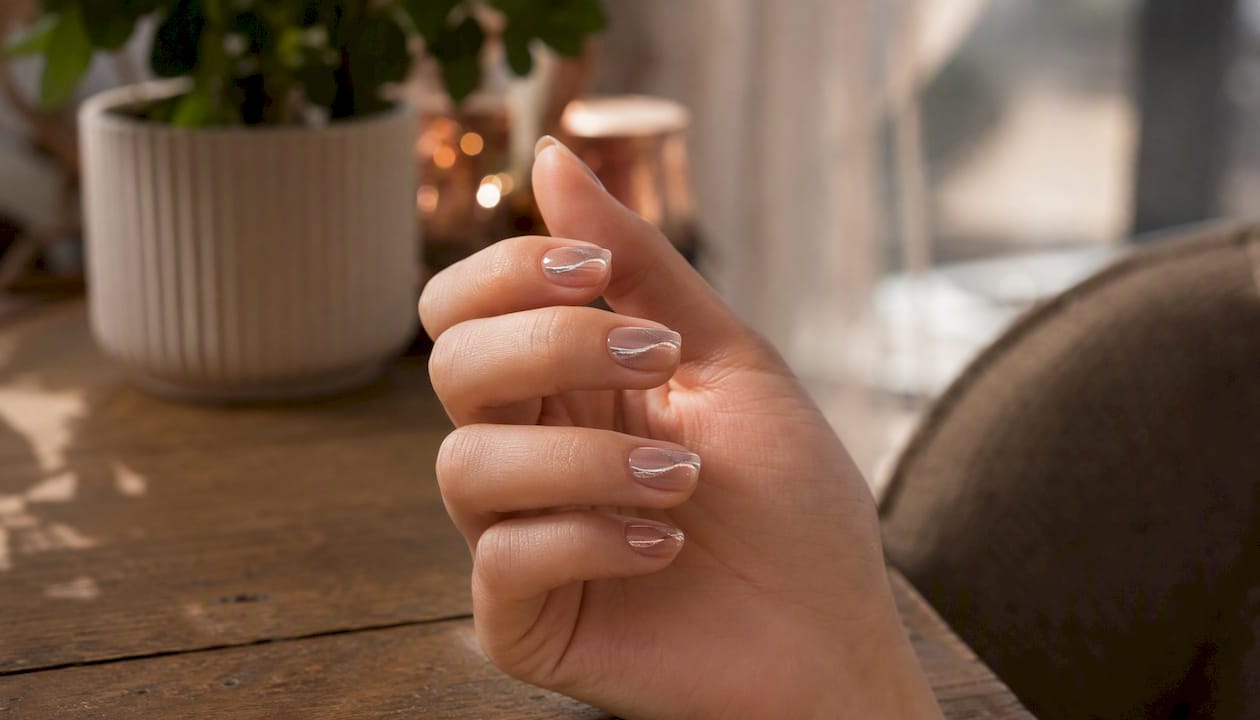
Glass cat eye is the 2026 breakout. The ultra-fine metallic pigment produces a narrower, more translucent highlight than classic magnetic gel. Over a sheer or jelly base, it looks like light passing through colored glass. Over a nude base, it reads as a subtle shimmer that works in professional settings. NailKnowledge notes the glass variant’s pigment is finer than standard magnetic polish, which is why the stripe appears more delicate.
Powder cat eye suits beginners well. The powder is applied over a sticky gel layer and then sealed with topcoat, so there’s no magnet timing pressure. The result is softer and more diffused than gel variants, closer to a glow than a sharp stripe.
Beyond those three, two treatments deserve attention:
- Barcode/striped: Multiple horizontal lines across the nail, created with a rectangular magnet. Glamour’s coverage of the barcode trend describes it as the coolest cat-eye derivative for spring, and the graphic quality makes it stand out on longer nails.
- Cat eye French tips: A translucent pink base with a platinum cat-eye stripe at the tip. Jennifer Lopez’s version added small embellishments at the cuticle line, turning a simple French into something genuinely elegant.
For color-specific inspiration, pink and mauve variants offer a softer, more romantic take. Demi Lovato’s mauve cat-eye — described as liquid velvet — shows how professional layering transforms a single color into something that reads almost three-dimensional.
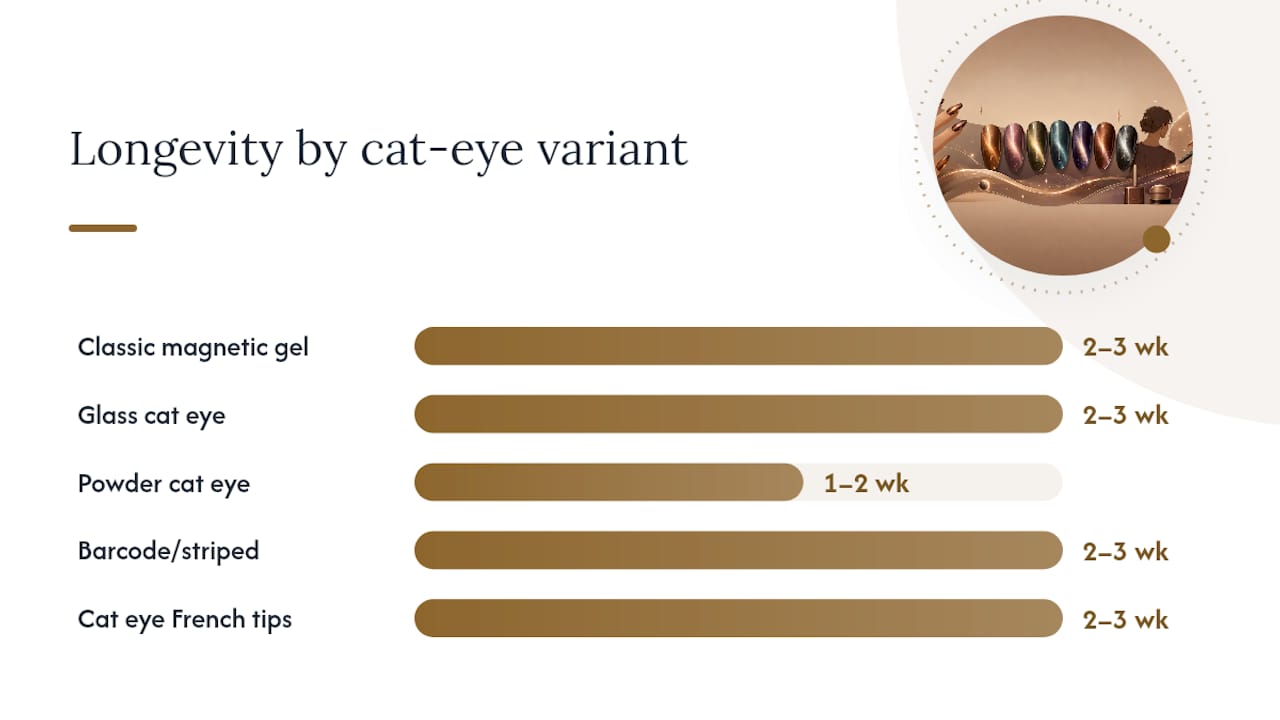
| Variant | Best for | Difficulty | Base color | Durability |
|---|---|---|---|---|
| Classic magnetic gel | Drama, all lengths | Beginner | Dark (black, navy) | 2–3 weeks with topcoat |
| Glass cat eye | Subtle, office-friendly | Beginner–Intermediate | Sheer, nude, jelly | 2–3 weeks |
| Powder cat eye | Soft glow, beginners | Beginner | Any | 1–2 weeks |
| Barcode/striped | Editorial, long nails | Intermediate | Dark or metallic | 2–3 weeks |
| Cat eye French tips | Special occasions | Intermediate–Advanced | Translucent pink | 2–3 weeks salon |
What tools and products do you need for cat eye nails at home?
A basic at-home kit needs four things: magnetic polish or powder, a magnet tool, an LED or UV lamp, and base and top coats. Everything else is optional.
- Magnetic polish: Brands like OPI and Dashing Diva offer magnetic gel polishes in the US. Sally Beauty carries several options in-store, and Amazon has a wide range of generic kits. Look for polishes with visible metallic shimmer in the bottle — that’s the pigment load you need.
- Magnet tool: A dual-ended wand covers most looks. One end gives a central stripe, the other a diagonal or starburst. For barcode nails, you need a separate rectangular magnet.
- LED lamp: A 36-watt LED lamp cures most gel formulas in 30–60 seconds. UV lamps work but take longer. Don’t skip this — a standard topcoat won’t cure magnetic gel.
- Base coat: A sticky gel base coat helps the magnetic polish adhere and prevents lifting.
- Top coat: A gel top coat seals the stripe and adds gloss. Some formulas are specifically designed for magnetic polishes to avoid dulling the effect.
Pro Tip: When buying a kit, prioritize magnet quality over polish quantity. A weak magnet produces a faint, blurry stripe no matter how good the polish is. Neodymium magnets give the strongest, cleanest results.
For US shoppers, starter kits on Amazon typically run $20–$40 and include polish, a basic magnet, and sometimes a small lamp. Individual pro-grade items cost more but last longer. Dashing Diva’s press-on magnetic options are a no-lamp alternative worth trying if you’re not ready to invest in a full gel setup.
How to do cat eye nails at home: step-by-step
The single most important rule: one nail at a time. Apply, manipulate, cure, repeat. Rushing through multiple nails before curing is the fastest way to lose the stripe.
- Prep your nails (5–10 minutes). Push back cuticles, lightly buff the nail surface, and apply a nail dehydrator or primer. This step prevents lifting and is worth the extra few minutes.
- Apply a gel base coat. Cure for 30–60 seconds under your LED lamp. The base should feel slightly tacky — that grip helps the magnetic polish bond.
- Apply your base color (optional but recommended). If you want a dark base for contrast, apply one thin coat of gel color and cure fully. Skip this step for glass or sheer effects.
- Apply magnetic gel polish. One thin, even coat. Don’t cure yet.
- Hold the magnet over the wet nail. Position it 1–2mm above the surface. Hold completely still for 10–15 seconds for a classic stripe, or up to 30 seconds for a barcode effect with a rectangular magnet.
- Flash-cure for 2–3 seconds. This locks the pattern before the full cure.
- Full cure: 30–60 seconds under the LED lamp.
- Repeat steps 4–7 for each nail individually.
- Apply gel top coat and cure fully. Wipe the sticky inhibition layer with a lint-free wipe and isopropyl alcohol.
Total time: roughly under an hour for a full set at home.
Pro Tip: If the stripe looks faint after curing, the polish layer was probably too thin or the magnet too far away. Apply a second coat of magnetic polish over the cured layer and repeat the magnet step — you can layer for a stronger effect.
Troubleshooting quick fixes:
- Fuzzy or blurry stripe: Magnet was too far away or moved during hold time. Redo that nail.
- Weak effect: Polish layer too thin, or pigment load in the formula is low. Try a second coat.
- Streaks: Polish applied unevenly. Thin coats always beat thick ones.
- Polish lifting at edges: Prep was skipped or incomplete. Dehydrator and primer are not optional.
Salon vs. DIY: which one is right for you?
Pick a salon for durability, complex layering, or any design that involves multiple gel colors, embellishments, or nail extensions. DIY works well for experimenting with a single variant, keeping costs down, or doing a quick refresh between salon visits.
- Cost: At-home kits run $20–$40 upfront; individual salon cat-eye manicures typically range from $45–$75 depending on complexity and location.
- Durability: A well-prepped salon gel manicure lasts 2–3 weeks. At-home results vary more widely based on prep quality and lamp wattage.
- Time: DIY takes 45–60 minutes once you know the process. A salon appointment runs 60–90 minutes including nail shaping, cuticle work, and finishing.
- Skill ceiling: Powder cat eye and single-stripe classic gel are genuinely beginner-friendly at home. Barcode nails, French cat-eye tips, and layered glass effects are harder to execute cleanly without practice.
When a salon is the stronger choice:
- Special occasions where the manicure needs to last and look flawless
- Nail health concerns (thin, damaged, or peeling nails need professional assessment)
- Complex layering — combining glass cat eye over a tinted gel base with rhinestones is difficult to execute cleanly at home
- Gel X or acrylic extensions, which require professional application
The gel nail services at Foxynailsreno are worth considering if you’re in Reno and want a result that holds up for three weeks without the prep-and-cure learning curve.
Pro tips and common mistakes to avoid
The single biggest difference between a crisp stripe and a blurry mess is magnet control and timing. Everything else is secondary.
Tips that actually move the needle:
- Keep the magnet at a consistent 1–2mm distance. Closer isn’t always better — too close and you risk touching the wet polish, which ruins the surface.
- Stir or shake your magnetic polish before each use. The metallic pigment settles at the bottom of the bottle and an under-mixed formula produces weak effects.
- Use a curved magnet on natural nails. Flat magnets work on flat surfaces; curved magnets follow the nail’s arch and produce a cleaner central line.
- For barcode nails, hold the rectangular magnet perfectly horizontal. Any tilt creates uneven lines.
- Flash-cure between nails to prevent the pattern on already-cured nails from shifting if you accidentally brush them.
Common mistakes:
- Curing before using the magnet (the stripe never forms)
- Working too many nails before curing (the pattern drifts)
- Applying thick coats (slows particle alignment and creates uneven stripes)
- Skipping top coat (the stripe dulls and chips faster)
- Using a UV lamp with too low wattage (undercured gel lifts within days)
If it goes wrong: An undercured or lifting nail can be soaked off and redone. Don’t peel — peeling gel removes layers of the natural nail plate with it.
How to maintain your manicure and remove it safely
Maintenance for cat eye gel is standard gel upkeep with one extra consideration: avoid acetone-based products on the nail surface between appointments, since acetone can dull the metallic stripe even through topcoat.
Daily care:
- Apply cuticle oil daily to keep the surrounding skin healthy and prevent lifting at the edges
- Wear gloves for cleaning or heavy dish-washing
- Avoid using your nails as tools — the free edge is the most common lift point
Safe removal:
- Lightly buff the top coat surface to break the seal.
- Soak a lint-free pad in pure acetone and place it on the nail.
- Wrap each finger in foil and wait 10–15 minutes.
- Slide the softened gel off gently with a cuticle pusher. Never force it.
- Apply cuticle oil immediately after removal.
For powder cat eye, the powder layer removes with the gel it’s sealed under — no separate step needed.
Allergy and sensitivity: Some people develop sensitivity to gel monomers or photoinitiators with repeated exposure. Signs include redness, itching, or swelling around the nail. If you notice any of these, stop using gel products and consult a dermatologist before continuing.
MRI safety: The magnetic particles in cat eye polish are cosmetic-grade and present in very small amounts. They are generally considered safe for MRI procedures, but individual imaging facilities sometimes ask patients to remove nail polish as a precaution. Check with your facility before your appointment if you’re concerned.
What to expect at Foxynailsreno for a cat eye manicure
Foxynailsreno’s salon workflow starts with prep that most at-home kits skip: cuticle removal, nail shaping, and a dehydrator step that significantly extends wear. The technician selects the base color with you before any polish goes on, which is where the design conversation happens — dark vs. sheer, single stripe vs. layered glass effect, accent nails vs. full set.
The in-salon process runs roughly like this:
- Nail prep and shaping (10–15 minutes): Cuticle work, filing, buffing, dehydrator
- Base coat and optional color base (5–10 minutes): Cured fully before magnetic polish goes on
- Magnetic polish application and activation (15–20 minutes): One nail at a time, with professional-grade magnets for cleaner stripe definition
- Top coat and finishing (5–10 minutes): Gel top coat cured and inhibition layer removed; cuticle oil applied
Add-ons available at Foxynailsreno include rhinestone embellishments, nail art accents, Gel X extensions for length, and custom nail shapes. A cat-eye French manicure combining a translucent base with a platinum stripe at the tip is one of the more requested salon-only designs — the precision required for the tip line is genuinely difficult to replicate at home.
For a look at finished work and technique, the Foxynailsreno videos page shows real client results across different cat-eye styles.
Why magnetic nails keep coming back
There’s a reason cat eye nails have cycled through trend peaks for over a decade without disappearing: the effect is genuinely hard to replicate with any other technique. No stamping plate, no foil, no hand-painted design produces that shifting, dimensional highlight. It’s one of the few nail looks that photographs well AND looks better in person.
What’s interesting about the 2026 moment specifically is that the variants have gotten more sophisticated while the entry barrier has dropped. Glass cat eye requires finer pigment and better magnets than the original formula, but those tools are now widely available at accessible price points. The barcode trend is a good example of how a simple technique change — swapping a round magnet for a rectangular one — creates an entirely different aesthetic without adding complexity.
At Foxynailsreno, the requests that are most satisfying to execute are the layered ones: a deep burgundy base with a rose-gold glass cat eye on top, or a sheer nude with a platinum stripe and a single rhinestone at the cuticle. Those combinations take about five minutes of extra planning and produce results that look custom-made rather than off-the-shelf. If you want to experiment at home first, start with a classic single-stripe on a dark base — it’s the most forgiving and the most dramatic. Then book a salon visit when you’re ready to layer.
Foxynailsreno does custom cat eye manicures in Reno, NV
Skip the magnet-timing stress and get a cat eye manicure that lasts three weeks. At Foxynailsreno, every appointment includes professional nail prep, custom base color selection, and magnetic activation with pro-grade tools — the kind of finish that’s genuinely difficult to replicate at home without practice.

Whether you want a classic velvet stripe, a glass cat eye over a sheer base, or a full cat eye French tip with rhinestones, the salon handles it. Gel X extensions, custom nail shapes, and embellishment add-ons are all available at the same appointment. Book your cat eye manicure at Foxynailsreno and walk out with a result worth showing off.
Sources
- 33 Stunning Cat Eye Nail Ideas, From Icy White to Moody Blue
- Glass Cat Eye Nails at Home: Spring 2026’s Most Mesmerising Magnetic Trend – NailKnowledge
- Barcode Nails Are the Coolest Cat-Eye Trend to Try for Spring | Glamour
- Demi Lovato’s Mauve Cat-Eye Nails Look Like Liquid Velvet—Watch the Video | Allure
- Jennifer Lopez’s Cat-Eye French Manicure Has the Most Elegant Details — See Photo | Allure
- Understanding Magnetic Gel Polish: The Science Behind Cat-Eye Nails
- 17 Pink Cat Eye Nail Ideas for a Sweetly Mesmerizing Mani