
An acrylic fill is a maintenance service that fills the exposed gap of natural nail growth between your cuticle and an existing acrylic enhancement, restoring both strength and appearance without removing the whole set. Fills are typically recommended every few weeks, depending on how fast your nails grow. When in doubt, book a professional.
Quick takeaways:
- Time: A standard fill appointment runs around an hour; backfills take longer.
- Cost: Fills generally cost less than a full set. Backfills (pink-and-white) run higher due to the extra technique involved.
- DIY vs. pro: Practiced DIYers can attempt basic fills at home, but a salon reduces risk and extends longevity significantly.
- When to see a pro: Multiple lifting spots, pain, cracked product, or any sign of infection means skip the DIY and book an appointment.
Table of Contents
- What does an acrylic fill actually do for your nails?
- How a professional acrylic fill works, step by step
- How often should you get fills, and what do they cost?
- DIY acrylic fills: what’s safe at home and what isn’t
- Daily habits that make your fill last longer
- Troubleshooting common fill problems
- When should you get a full removal instead of another fill?
- Why a professional salon fill protects your nails better
- Key Takeaways
- What a nail technician actually looks at during your fill
- Ready for a professional fill at Foxynailsreno?
- Useful sources for further reading
What does an acrylic fill actually do for your nails?
A fill, also called a refill or rebalance, addresses one simple problem: your natural nail keeps growing, but the acrylic doesn’t move with it. That creates a visible gap near the cuticle and, more critically, shifts the structural high point of the nail (the apex) toward the free edge. As the apex migrates with growth, pressure redistributes unevenly and breakage risk climbs. Repositioning the apex during a fill is not cosmetic; it is structural maintenance.
Fills also protect the natural nail from repeated soak-off cycles. Every full removal involves acetone exposure and mechanical filing, both of which thin the nail plate over time. Regular fills let you preserve the existing enhancement and avoid that cycle.
Common fill variations include:
- Color fill: New acrylic applied at the growth zone, then the whole nail is recolored.
- Pink-and-white backfill: The white free edge is removed and rebuilt, and the smile line is recreated. More time-intensive and priced accordingly.
- Rebalance: Apex is repositioned and the overall shape is corrected, often done when the nail has grown significantly or the structure has shifted.
- Overlay fill: Used when no tip extension is present, just a thin acrylic layer over the natural nail.
Pro Tip: Schedule your fill before you can see a noticeable gap or feel any lifting at the edges. Waiting too long lets moisture get under the product, which is a common cause of lifting and potential infection.
How a professional acrylic fill works, step by step
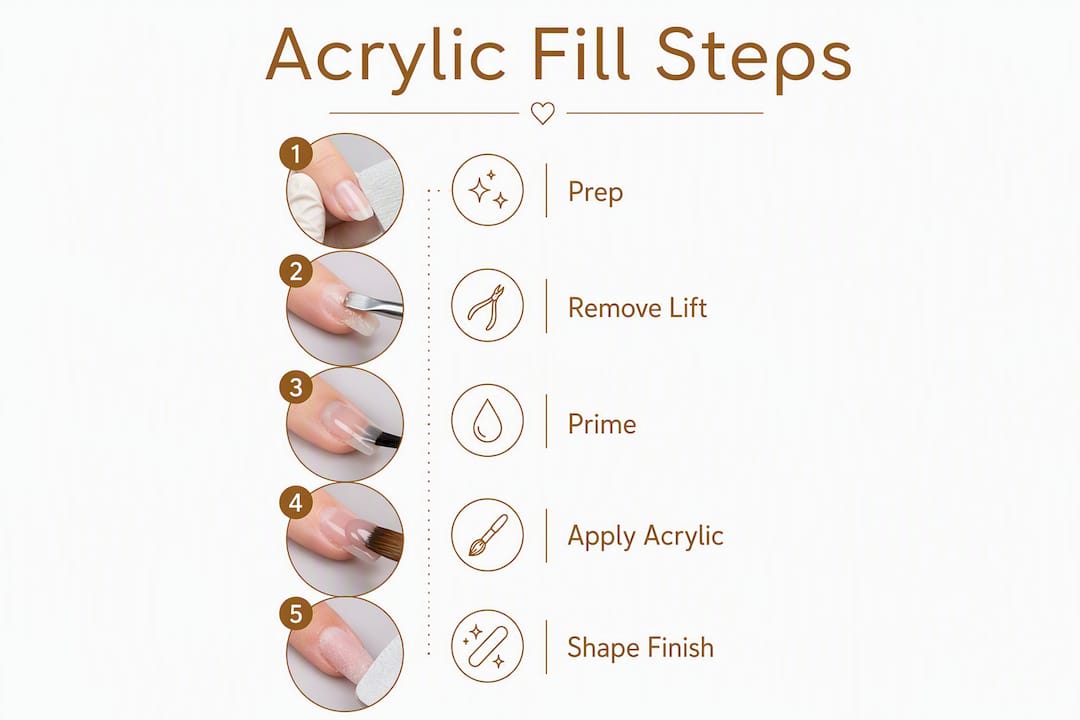
Professional salon fills follow a predictable workflow: prep, remove lifting, prime, apply new acrylic, then shape and finish. Each step has a safety checkpoint built in.
| Step | Action | Key safety note |
|---|---|---|
| — | Push back and clear cuticle tissue; clean the nail plate | Residual cuticle tissue blocks adhesion and causes early lifting |
| 2. Remove lifting | E-file or hand-file lifted product; feather edges into natural nail | Use low e-file speed; avoid thinning the natural plate |
| 3. Dehydrate and prime | Apply dehydrator, then primer to the growth zone | Primer on skin causes irritation; keep it on the nail plate only |
| — | Place beads at the growth zone; blend toward the free edge | Build thin at cuticle, thicker at apex, thin again at free edge |
| — | E-file or hand-file to blend old and new product; refine shape | Check for ridges or a visible shelf where old meets new |
| — | Buff, apply top coat or gel top | Confirm no lifting before sealing |
The feathering step in Stage 2 is where most DIY fills go wrong. Using an e-file at low speed to feather old acrylic into the natural nail creates a smooth ramp that prevents a bulky shelf and early lifting. Skip it, and you will feel a ridge within days.
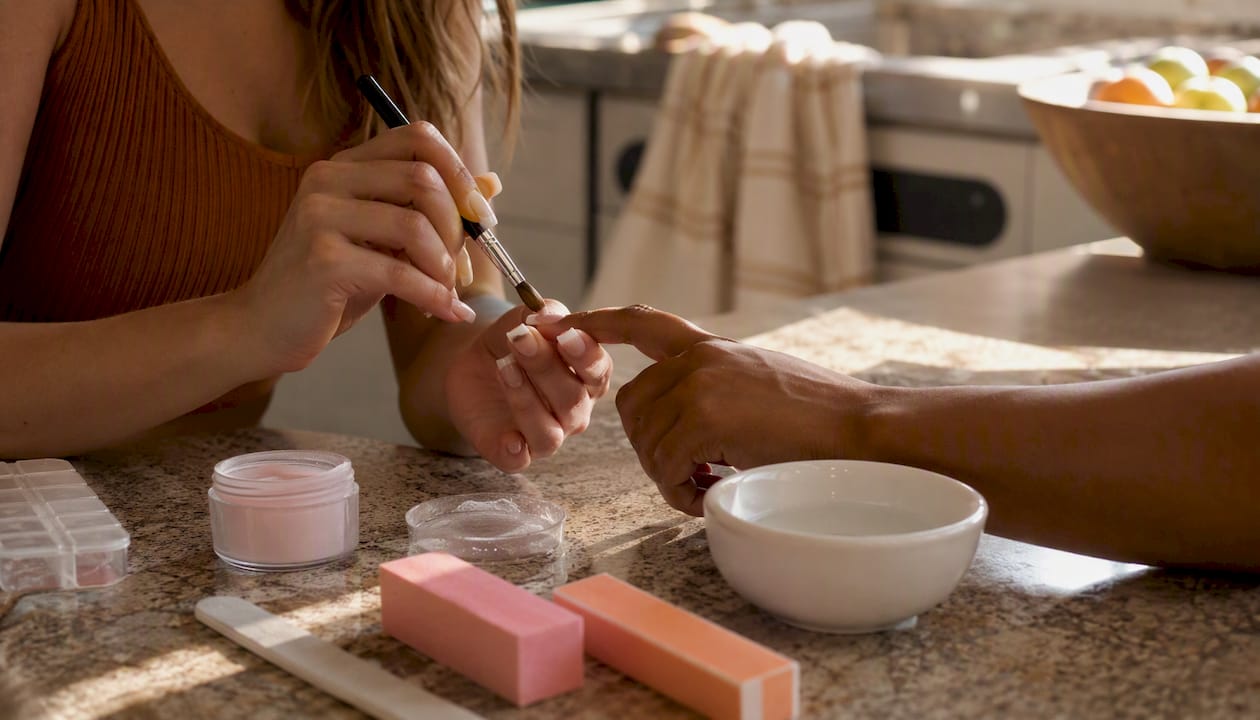
For filing, a medium-grit 150–180 sanding band or hand file removes surface shine and loose product without thinning the natural plate. Going coarser than that increases sensitivity and weakens the nail long-term.
A standard color fill takes 45–60 minutes in a skilled technician’s hands. A pink-and-white backfill, which requires reversing the application order and refining the smile line, typically adds 20–30 minutes to that.
How often should you get fills, and what do they cost?
A few weeks is a common guideline, but it is not universal. Faster nail growth, active hands, or a job that puts nails under stress can push you toward the shorter end. Slower growers with careful habits can sometimes stretch to four weeks, though the structural risk increases past that point.
| Fill interval | Typical scenario | Approximate appointment length |
|---|---|---|
| Every 2 weeks | Fast growth, active lifestyle, visible gap quickly | 45–60 minutes |
| Every 2–3 weeks | Average growth, standard wear | 45–60 minutes |
| Every few weeks | Slow growth, careful maintenance, no lifting | 45–60 minutes |
| Backfill (as needed) | Pink-and-white sets, smile line refresh | — |
On cost: fills run less than a full set because the technician is working with existing structure rather than building from scratch. Backfills cost more than standard color fills. Prices vary by region and salon, but nail art pricing context and local salon rate ranges can help you benchmark what to expect in your area.
Signs you are overdue for a fill:
- Visible gap of 3mm or more near the cuticle
- Lifting at any edge, even minor
- The nail feels thinner or more flexible than usual
- The apex has shifted noticeably toward the tip
- Surface looks dull, cloudy, or discolored
DIY acrylic fills: what’s safe at home and what isn’t
Basic fills can be attempted by practiced DIYers, but the margin for error is narrow. Common mistakes like uneven application and over-filing cause lifting, thickness issues, or nail thinning, and those problems compound with each subsequent fill.
The safest at-home tasks are surface buffing with a medium-grit file, applying a thin fill layer with a practiced brush technique, and finishing with a quality top coat. If you have done this before and your nails are in good shape, a home fill is a reasonable option between salon visits.
What you need before you start:
- Acrylic powder and monomer (matched formulas)
- A quality kolinsky or synthetic brush
- Dehydrator and primer
- Medium-grit file (150–180) and a buffer
- Nitrile gloves and adequate ventilation
The biggest risk in DIY fills is not the acrylic itself. It is the prep. Skipping thorough cuticle clearance or applying primer unevenly creates adhesion failures that trap moisture under the product. Trapped moisture is how bacterial and fungal issues start. If you cannot see clean, dry nail plate at the growth zone before you apply acrylic, stop and start the prep over.
When to put down the kit and book a salon:
- Multiple lifting spots across several nails
- Any pain, redness, or swelling around the nail
- Cracked or broken product you cannot cleanly file away
- You are pregnant or have known sensitivities to acrylate chemicals (see pregnancy-safe nail care guidance for more detail)
- Online tutorials and DIY guides frequently caution that results improve significantly with practice and appropriate PPE; if you are new to this, a salon visit first is worth the cost
Daily habits that make your fill last longer
Consistent aftercare is the single biggest factor in how long a fill holds between appointments. A few minutes a day extends wear by days.
Daily habits that protect your fill:
- Apply cuticle oil morning and night, working it into the skin around the nail. Hydrated skin lifts less.
- Wear gloves for dishes, cleaning, and any task involving prolonged water exposure or harsh chemicals.
- Avoid using your nails as tools. Opening cans, peeling labels, and similar habits put lateral stress on the enhancement.
- Check edges daily for any early lifting. Catching it early means a quick fix; ignoring it means moisture gets in.
Weekly habits:
- Gently clean under the free edge with a soft brush.
- Inspect the apex area for any thinning or shifting.
- If you notice a small lift at one edge, a drop of nail glue can hold it temporarily until your appointment, but do not use it as a substitute for a proper fill.
Products and behaviors to avoid:
- Acetone-based removers on the nail surface between fills (they soften the acrylic)
- Picking or peeling at lifting edges (this pulls layers of natural nail with it)
- Prolonged soaking in hot water, pools, or hot tubs
Pro Tip: Moisture and residual cuticle tissue are the leading causes of poor adhesion and early lifting. The most effective micro-habit is drying your hands thoroughly after washing and applying cuticle oil immediately after. That sequence keeps the skin supple without letting water sit at the nail edge.
Troubleshooting common fill problems
Most fill problems trace back to one of three root causes: poor prep, incorrect product ratio, or mechanical stress. Knowing which one you are dealing with tells you whether it is a quick fix or a salon visit.
| Problem | Likely cause | Fix |
|---|---|---|
| Lifting at cuticle | Residual cuticle tissue or moisture at application | Dehydrator + primer reapplication; full rebalance if widespread |
| Lifting at free edge | Thin product at the tip; mechanical stress | File back the lifted area; reapply and seal |
| Visible ridge (shelf) | Old and new acrylic not feathered properly | E-file to blend; hand-file smooth |
| Thick, uneven surface | Too much product applied at once | File down; rebalance apex |
| Cloudy or yellowing acrylic | UV exposure, product age, or trapped moisture | Full soak-off and new set if widespread |
| Cracking or snapping | Apex too thin or too far toward the free edge | Rebalance apex; add thickness at stress point |
Quick home fixes: a small lift with no moisture underneath can be gently filed back and sealed with a drop of nail glue. A minor ridge can be buffed smooth. Anything beyond that, book a salon.
Signs that require professional care immediately:
- Green, yellow, or dark discoloration under the acrylic (possible bacterial infection)
- Pain, swelling, or heat around any nail
- Rash or itching on the skin near the nail (possible acrylate allergy)
- Cracking that exposes the natural nail plate
Acrylate allergies are real and can develop even after years of wearing acrylics without issue. If you notice skin reactions, stop all acrylic products and see a dermatologist before your next nail appointment.
When should you get a full removal instead of another fill?
The rule of thumb: if more than two or three nails have significant lifting, if the acrylic has been on for more than 8–10 weeks without a proper rebalance, or if there is any sign of infection or damage to the natural nail, a full soak-off and fresh set is the better call.
Decision checklist:
- Multiple lifts: More than two nails lifting means the adhesion has broadly failed. A fill will not fix the underlying cause.
- Infection or discoloration: Never fill over a green or dark nail. Soak off, treat, and let the nail recover.
- Severely thinned natural nail: If the plate feels paper-thin after filing, it needs recovery time before a new enhancement.
- Acrylic age: Product that has been filled repeatedly without a full rebalance can become uneven in thickness and structure.
- Color change or staining: Deep staining through the acrylic usually means a full removal and fresh start.
Backfill vs. fill: A backfill is a specific technique for pink-and-white sets where the white free edge is removed and rebuilt to refresh the smile line. It is not a full removal; the pink body of the nail stays. Choose a backfill when the smile line has grown out but the overall structure is still sound.
After a soak-off, give your natural nails at least one to two weeks without enhancement if they feel thin or sensitive. Use a strengthening base coat, keep them trimmed short, and apply cuticle oil daily. Most nails recover fully within a few weeks.
Why a professional salon fill protects your nails better
A properly performed salon fill reduces long-term nail damage because trained technicians catch problems before they compound. At Foxynailsreno, every fill appointment starts with a nail assessment: the technician checks for lifting, cuticle tissue overgrowth, thickness balance, and any signs of infection before touching a file.
What to expect at a Foxynailsreno fill appointment:
- Nail assessment and cuticle prep before any filing begins
- E-file feathering at low speed to create a clean ramp between old and new product
- Dehydrator and primer applied precisely to the growth zone
- Apex repositioning as part of every rebalance, not just when you ask for it
- Shape and length adjustments available during the fill, including changes to nail shape
The difference between a salon fill and a home fill is not the acrylic. It is the assessment. A trained technician sees the early lift you missed, the cuticle tissue you did not fully clear, and the apex that has shifted two millimeters toward the tip. Catching those details at week two prevents the cracked nail at week four.
Foxynailsreno uses sanitized tools for every client and follows strict hygiene protocols between appointments. If you want to see the acrylic nail service workflow and what a professional fill looks like in practice, the salon’s full guide walks through each stage.
One appointment tip: arrive with clean, polish-free nails if possible. It saves prep time and lets the technician assess the natural nail and existing product without having to remove color first.
Key Takeaways
An acrylic fill every 2–3 weeks, with proper prep and aftercare, is the most effective way to maintain both the appearance and structural health of acrylic nail enhancements.
| Point | Details |
|---|---|
| Fill interval | Get a fill every 2–3 weeks; waiting longer increases lifting and breakage risk. |
| DIY caution | Basic home fills are possible with practice, but skipping proper prep causes moisture trapping and infection risk. |
| Aftercare matters | Daily cuticle oil and gloves for wet tasks extend fill life and reduce lifting between appointments. |
| Full removal signs | Multiple lifts, discoloration, pain, or thinned natural nails mean a soak-off and fresh set, not another fill. |
| Foxynailsreno | Professional fills at Foxynailsreno include a nail assessment, apex repositioning, and sanitized tools every appointment. |
What a nail technician actually looks at during your fill
Safety and structural balance come first in every fill appointment, before any conversation about color or shape. When a client sits down, the first thing a technician checks is not the nail polish or the length. It is the lift pattern.
Lifting at the cuticle and lifting at the free edge tell different stories. Cuticle lifting usually points to prep issues from the last appointment or a client who has been soaking in water frequently. Free-edge lifting often means the product was applied too thin at the tip, or the nail took a mechanical hit. Both need different corrections, and both are visible within the first 30 seconds of looking at the hand.
Thickness balance is the next check. The apex should sit at roughly the highest point of the nail, about two-thirds of the way from cuticle to free edge. When it has migrated toward the tip with growth, the nail is structurally weaker than it looks. Repositioning it is not optional; it is the whole point of a rebalance.
Stylistic choices during a fill are more flexible than most clients realize. You can change your nail shape at a fill appointment, going from oval to square or coffin to almond, as long as there is enough length to work with. Smile line adjustments on pink-and-white sets are done during a backfill, not a standard color fill. If you want a shape change, mention it before the technician starts filing, not after.
For clients: come with clean hands, no lotion on the nails, and a realistic sense of what the existing length allows. If you want something dramatically different from what you have, your technician will tell you whether a fill can get you there or whether a full set is the better starting point.
Ready for a professional fill at Foxynailsreno?
Skipping the guesswork of DIY and sitting down with a trained technician is the fastest way to get a fill that actually lasts. At Foxynailsreno in Reno, NV, fill appointments include a full nail assessment, apex repositioning, and a finish that holds up to real daily life, not just the first 48 hours.

When you book, mention the type of fill you need (standard color fill or pink-and-white backfill), the date of your last appointment, and any lifting or concerns you have noticed. That information lets the technician prepare the right tools and allocate the right amount of time. Ready to book? Schedule your fill appointment at Foxynailsreno and walk out with nails that are structurally sound and exactly the shape you want.
Useful sources for further reading
These are the professional resources and industry references used throughout this guide:
- Young Nails — How To Fill Acrylic Nails — A practitioner-level walkthrough of the full fill process, including feathering technique, grit guidance, and adhesion prep. Start here for the most detailed step-by-step.
- NailPro — How To Do An Acrylic Backfill: Covers the specific technique for pink-and-white sets, including smile line refinement and product layering order.
- NailKnowledge — Professional Insights on Fills: Explains the structural role of the apex and why repositioning it during a fill is a health requirement, not just a cosmetic step.
- Foxynailsreno — Acrylic Nails Complete Guide: Salon-specific guide to acrylic procedures and maintenance, including what to expect at a professional appointment.